Getting started
This page has a few step-by-step tutorials to help you get familiar with Assertive Script. We highly recommend to follow them in the prescribed order.
Prerequisites
A VSCode extension has been published in order to support a smooth development experience for Assertive Script. Follow the installation instructions on the VSCode extension page to get the extension. Every tutorial on this page assumes that the Assertive VSCode extension is succesfully installed and that you have a running instance of VSCode.
Hello world!
Learning a new language should always start with a decent ‘Hello, world’. Assertive Script is no exception.
- Create a new file called helloworld.ass
- Copy the following code to the file:
out "Hello world!"; - Save the file.
- To run the script, press ctrl+alt+a on Windows and Linux or shift+cmd+a on macOS. This will invoke the ‘Assertive: Run Script’ command.
- Notice the appearance of an output window that says “Hello world!”.
Congratulations! You executed your first Assertive script!
Variables
We will now modify the code so we won’t send a greeting to the entire world, but to someone special.
$name = "You";
out "Hello, {{ $name }}!";
- Run the script again to see how the variable is replaced inside the string.
- More information about variables can be found here.
Requests
The following steps will show how to perform a simple HTTP GET request and extract some data from it. We will demonstrate this with the publicly available Starwars API.
- At the top of the file, insert the following two variables:
$host = "https://swapi.dev/api/"; $id = 1; - Next, add code that peforms an HTTP GET request and stores the response in a variable called
$person.$person = GET "{{ $host }}people/{{ $id }}"; - Succesful responses to this URI contain a JSON response body with an object that has a key called
name. To get its value, we can use the built-inJsonPathfunction by adding this code:$name = JsonPath($person, "$.name");So far, we should have the following code:
//declare a $host variable $host = "https://swapi.dev/api/"; //here we set the id of the person we want to get $id = 1; //call Starwars API $person = GET "{{ $host }}people/{{ $id }}"; //extract the name $name = JsonPath($person, "$.name"); //send name to the output window out "Hello, {{ $name }}!"; - Execute the code above and notice the text “Hello, Luke Skywalker!”
- More information about all HTTP request options can be found here.
Functions
To make the code above reusable, we can wrap it into a function. In Assertive Script, a function always starts with the def keyword and is followed by a name. Parameters are enclosed in parenthesis.
- Consider the following code to see how the code we used earlier is now wrapped in a function called
getName.
//declare $host variable
$host = "https://swapi.dev/api/";

//declare a function that gets the name of a Starwars person by its ID
def getName($id){
    //send request and store the response in the $person variable
    $person = GET "{{ $host }}people/{{ $id }}";
    //return the name from the response body
    return JsonPath($person, "$.name");
}

//call the function with an ID of your choice and output the name:
out getName(1);
- Execute the code and notice how you can use the function to get the name of an arbitrary person
- More information about functions can be found here.
Asserts
Assertive supports a special assert keyword. This keyword can be used to test a certain condition and automatically report whether the test passed or failed. We will modify the function above to assert if the response statuscode was 200 (OK). After the condition, an optional description can be added so Assertive Script will automatically output this description together with the test result.
def getName($id){
    //perform the GET request and store the response in the $person variable
    $person = GET "{{ $host }}people/{{ $id }}";
    //get the statuscode of the response

    //assert that the server replied with 200 (OK)
    assert StatusCode($person) = 200 "Starwars person fetched";

    //return the name from the response body
    return JsonPath($person, "$.name");
}
- More information about asserts can be found here.
Loops
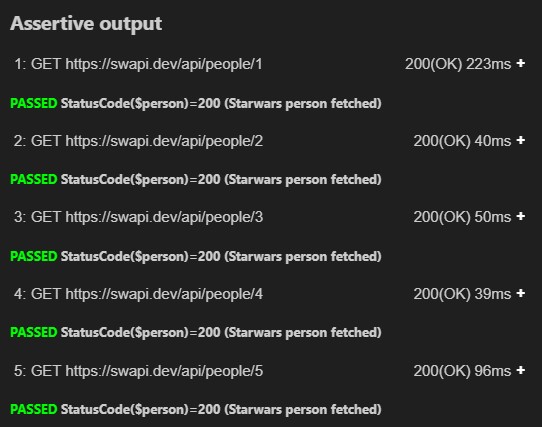
Assertive also supports control-flow statements like conditional and loop statements. The next sample demonstrates how we can show the name of the first 5 people by calling the function we created earlier.
loop $id from 1 to 5
{
    out getName($id);
}
After executing this code, your output window should show something similar to this:

You have made it until the end of our getting started tutorial! To explore all features of Assertive Script, visit the language page.